Most of you would agree that cyclocross is one of the most exciting spectator sports, either live in person, or, later on TV or online. Lately, a popular form of amateur race coverage has been via a helmet or bike-mounted video camera. With digital video cameras getting smaller and cheaper, recording your own race to relive later or to show to friends and family who couldn’t make the race has never been easier.
The Specs:
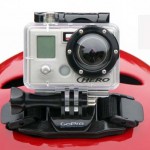
Cyclocross Magazine took a look at one way to record your own movies via the GoPro Hero Wide Helmet Camera. The GoPro Hero Wide combines a five megapixel camera and 512×368 pixel, 30 frames per second video camera into one small, less than 5-ounce unit powered by two AAA batteries. The company advises to use only lithium or NI-MH batteries for reliable recording. The unit is a small, lightweight integrated unit – no external battery or CPU, everything is enclosed in the one camera. The camera is enclosed in a waterproof housing. It’s the housing that gets mounted to you or your bike.
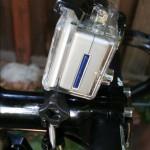
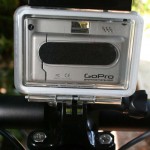
The $189 Helmet version of the Hero camera offers a number of versatile mounting options, with several different straps (for helmets with vents and for a headlamp-style mount) as well as adhesive mounts that provide a Fastex-like quick release mount. We also opted for the optional Seatpost/Handlebar mount, which provides bike-mounted camera options on not only seatposts or handlebars, but also stems, forks, and seat stays.
The camera comes with a modest 16mb of internal memory, but is expandable up to 4 gb via an SD memory card. With a 2 gb card, you are able to get almost an hour’s worth of video.
Operation:
Users familiar with the instant feedback of today’s modern digital cameras may take some time getting used to the GoPro Hero camera – its lack of an preview screen brings one back to the days of film. You have to trust you got everything right. There are a number of pretty logical icons and abbreviated words to indicate settings on the small LCD screen that you need to sort through and remember. A red light does let you know when the camera is on and recording, but the manual is certainly handy to make sure you don’t have the camera set to take pictures every 5 seconds, instead of filming video.
The most basic use is quite simple: Press the power button on the front to turn it on, and hit the shutter button and you’re filming. Hit the shutter button again to stop. Turn it off by holding the power button down again.
The Result:
We’ve had the camera for a few months. Our first attempt was the UCI Cyclocross World Championships course-preview video, piloted by Nick Weighall. While the video quality was decent, the sound quality was awful – it was almost 100% static. But it was also user error. The manual clearly states that for high-vibration activity the camera’s volume setting should be “Low” instead of “High.” Oops. That’s why we had to remove the sound from that video.
More disappointing was that our batteries did not last more than a lap. But user error could also be in play. The company says that when not in use, batteries should be removed from the camera. We installed the batteries only the night before going to the venue but perhaps should have waited to the last minute.
But we were impressed with the video quality. The ultra-wide perspective shows a lot of the course and passing riders and spectators, although tends to make everything look quite small and wide or tall objects can get distorted like with most fish-eye lenses. The video quality was quite smooth. And exposure was decent. We just had to make the batteries last and the sound work.
Well, several attempts later, we think we got it right. We charged our NIMH batteries, left them outside the camera, put them in right before a ride, and never ran out during a ride of filming 30 minutes of riding (in different segments). So you certainly should pay attention to the manual. The resulting sample video, in its true resolution, can be downloaded here. It’s 53mb and 1:29 long, in AVI format.
The sound is subtle but the static is gone. There’s a lot in the field of view, but the wide perspective makes us feel a bit removed from the scene – it’s hard to really see people’s expressions or make out jerseys, but it gives a great view of the scenery.
Conclusion:
The GoPro Hero Wide Helmet camera is a simple, lightweight and easy way to get started in making your own cyclocross or other cycling movies. You won’t win any Oscars for cinematography, but you may capture the excitement of a ‘cross race to relive another day and share with those that couldn’t attend in person. The camera works as it should when you get the settings right and listen to instructions, but can be frustrating when you’re on the trail and you leave the manual behind.
We would much prefer a longer life battery pack (rechargeable lithium ion would be great), and would like to have a non-waterproof housing that allows the microphone to pick up higher-fidelity sound. And a slightly narrower field of view would be preferable.
The best part of the GoPro Hero is its versatility. With the plethora of available mounts, you can snorkel, surf, snowboard, skydive and bike all with the one camera. For the average cyclocrosser suffering through the long off-season, this could be the perfect way to spice up the chore of other outdoor activities.
GoPro Hero Wide Camera;
MSRP: $189
Camera: 5 megapixel still, 512×368 pixel, 30 frames per second video.
File format: AVI
Battery: Two AAA, Lithium or NI-MH required
For more info: GoPro Website


